
Stable Diffusion Phenomenon: from core principles to real-world applications
Hands-on Guidance

Stable Diffusion has been talked about a lot lately. AI is changing fast, and rethinking our approach to creating and understanding new data is imperative. One of the hottest topics is Stable Diffusion (SD), a relatively new model for making AI-generated images. For those who’ve been tracking AI’s evolution, Stable Diffusion is a testament to how far we’ve come. It’s not just about algorithms and computations; it’s about reshaping the boundaries of what’s possible: a paradigm shift in how we perceive and interact with AI. This article covers:
Fundamentals and step-by-step practical tutorial for SD, including different tools like Dream Studio and Automatic 1111.
Explains diffusion concept and its application in AI.
Discusses the role of neural networks like UNet in the process.
Targets both AI beginners and professionals and anyone who loves tech.
Why is Stable Diffusion Suddenly Everywhere?
Well, a couple of reasons:
It’s open-source. That means it’s not just for the big tech; it’s for everyone. Whether you’re a bootstrapping startup or a well-established tech firm, SD offers you the same level of sophistication and capability. It’s the democratisation of AI.
It’s fast — blazing fast. We’re talking about a tech that can run on consumer GPUs and even CPUs. That means you don’t need a supercomputer to start leveraging SD. Your existing infrastructure is likely more than enough to get you started.
It is a playground for innovation for multiple industries, from ad campaigns to designing prototypes, or even movie posters could be generated with a simple text prompt!
Let’s explore what’s behind it.
Diffusion Demystified: The Core of Stable Diffusion
At the heart of Stable Diffusion lies a concept that’s both fundamental and transformative: Diffusion.
🧠 Remember diffusion from your high school science classes? Particles moving from high to low concentration area. Well, Stable Diffusion takes the concept to the next level.
It’s like diffusion on steroids, but for AI.

Diffusion models are generative models, which means that they generate new data based on the data they are trained on. For example, a diffusion model trained on a collection of human faces can generate new and realistic human faces with various features and expressions, even if those specific faces were not present in the original training dataset.
From Noisy to Clear: Image transformation
Imagine you’ve snapped a photo with your phone, but it’s filled with noise, making the details hard to recognize. Now, what if there was a way to gradually reduce this noise, step by step, refining the image until it’s crystal clear? That’s precisely what Diffusion aims to achieve. It’s a restorative process, where each iteration brings the image closer to its ideal state.
Neural Networks: again?
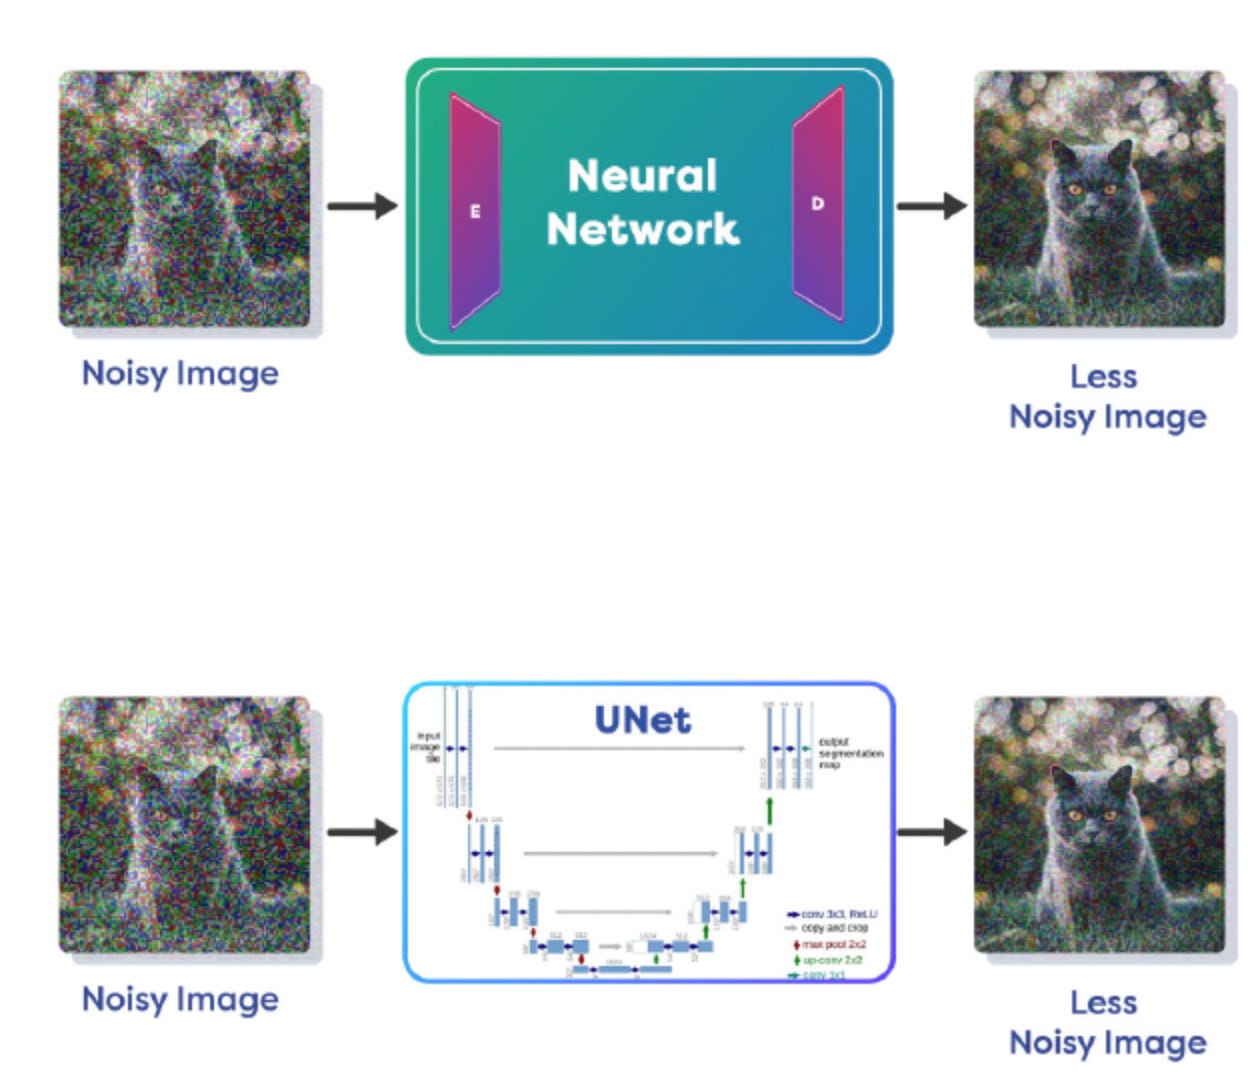
To aid in the denoising process, neural networks, particularly those with Encoder/Decoder architectures like UNet, play a pivotal role. These networks are adept at understanding the distribution of noise and predicting it. By learning how noise manifests and how it can be removed, these networks become instrumental in the Reverse Diffusion process.
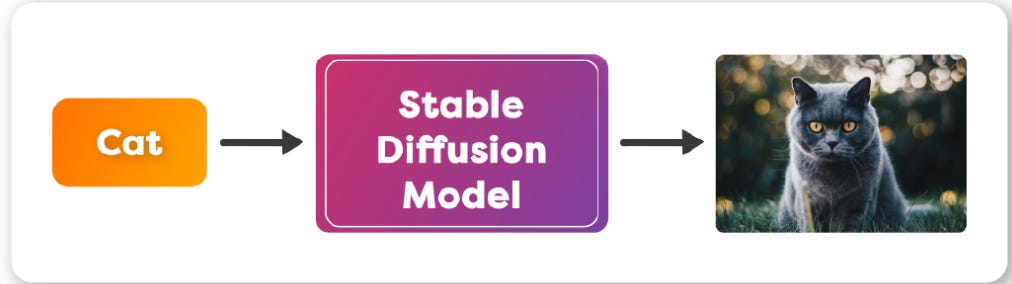
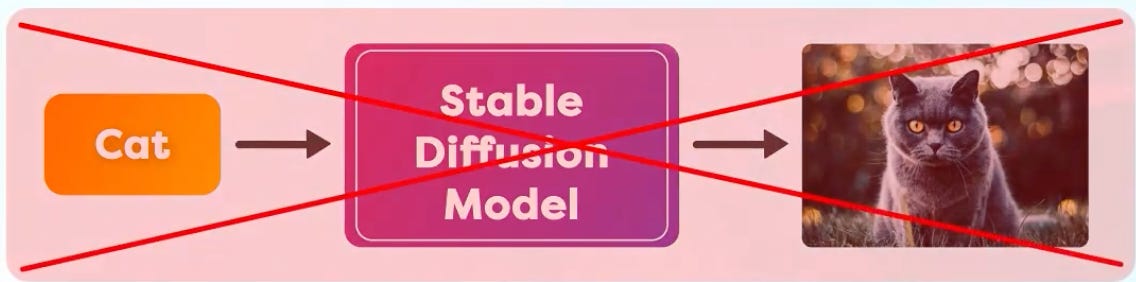
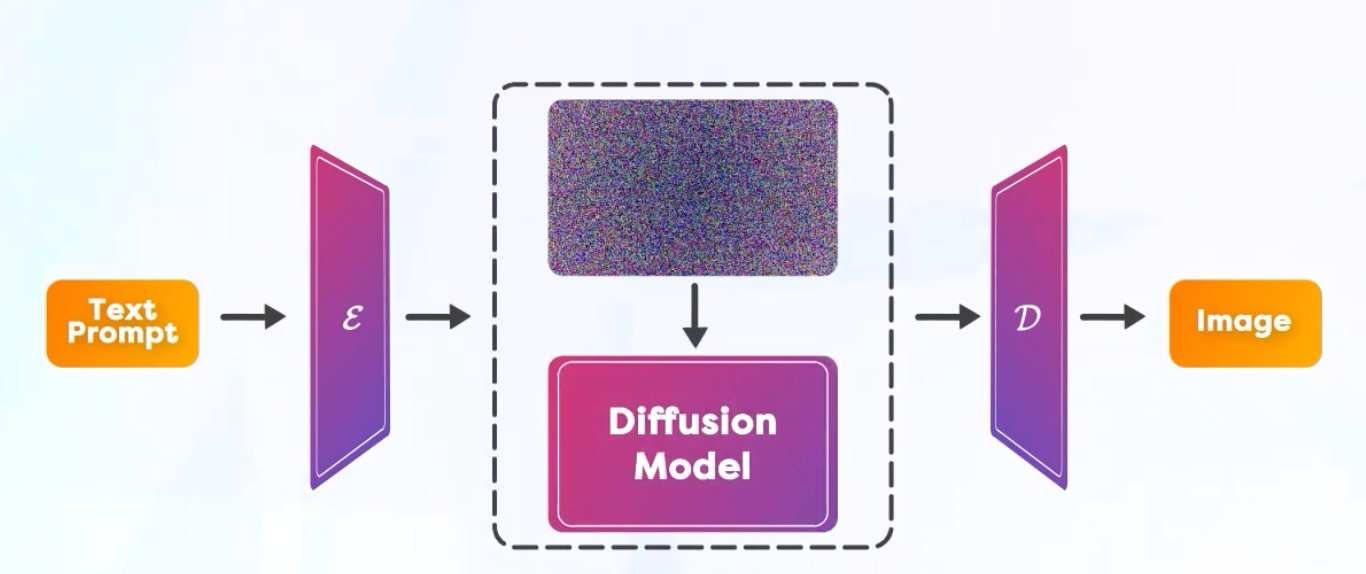
As you have seen in many text to image models, you just input a Text Prompt and it magically creates an Image as the output. You may think the model is converting text into an image as the name suggests. Well, it is not exactly how it works.
🎭 The duality of Stable Diffusion: Forward and Reverse Diffusions
Forward Diffusion is like that artist who intentionally messes up a canvas, only to set the stage for a masterpiece. It adds noise to an image, degrading it step by step. “Why on earth would you do that?”
Simple: to train the model to understand the restoration.
By understanding how an image degrades, the model learns to reverse this degradation.
And then there is Reverse Diffusion, the Gandalf of this story. It takes that noisy image and, with each iteration, cleans it up, restoring it to its original glory. And guess what’s powering this magic? Neural networks with Encoder/Decoder architectures like UNet. These are not just any neural networks; they’re the supreme of the AI world, trained to understand and predict noise distribution.
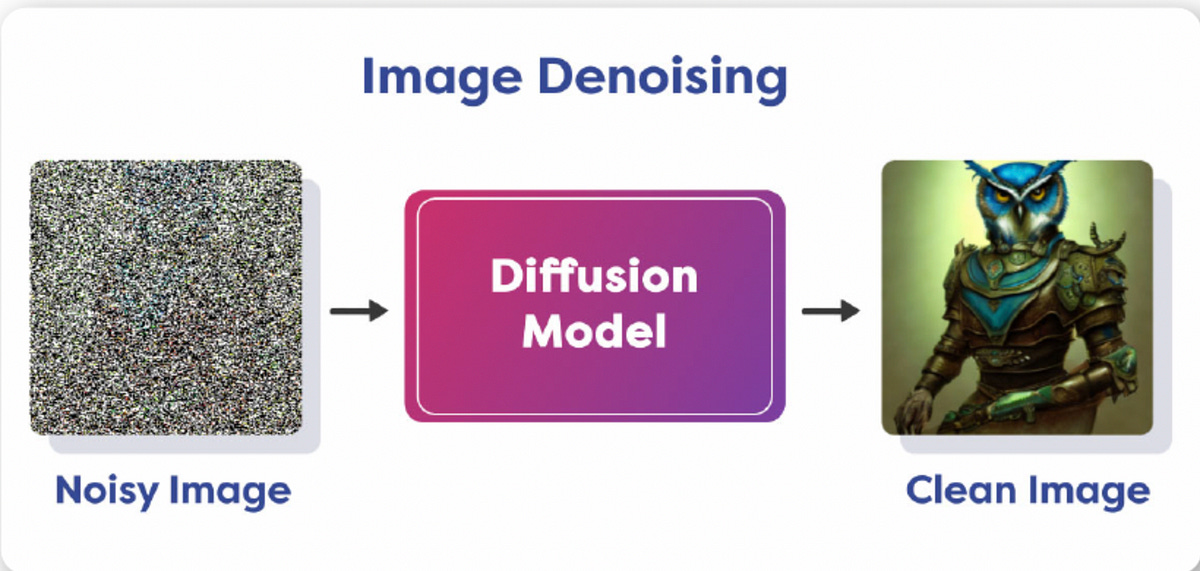
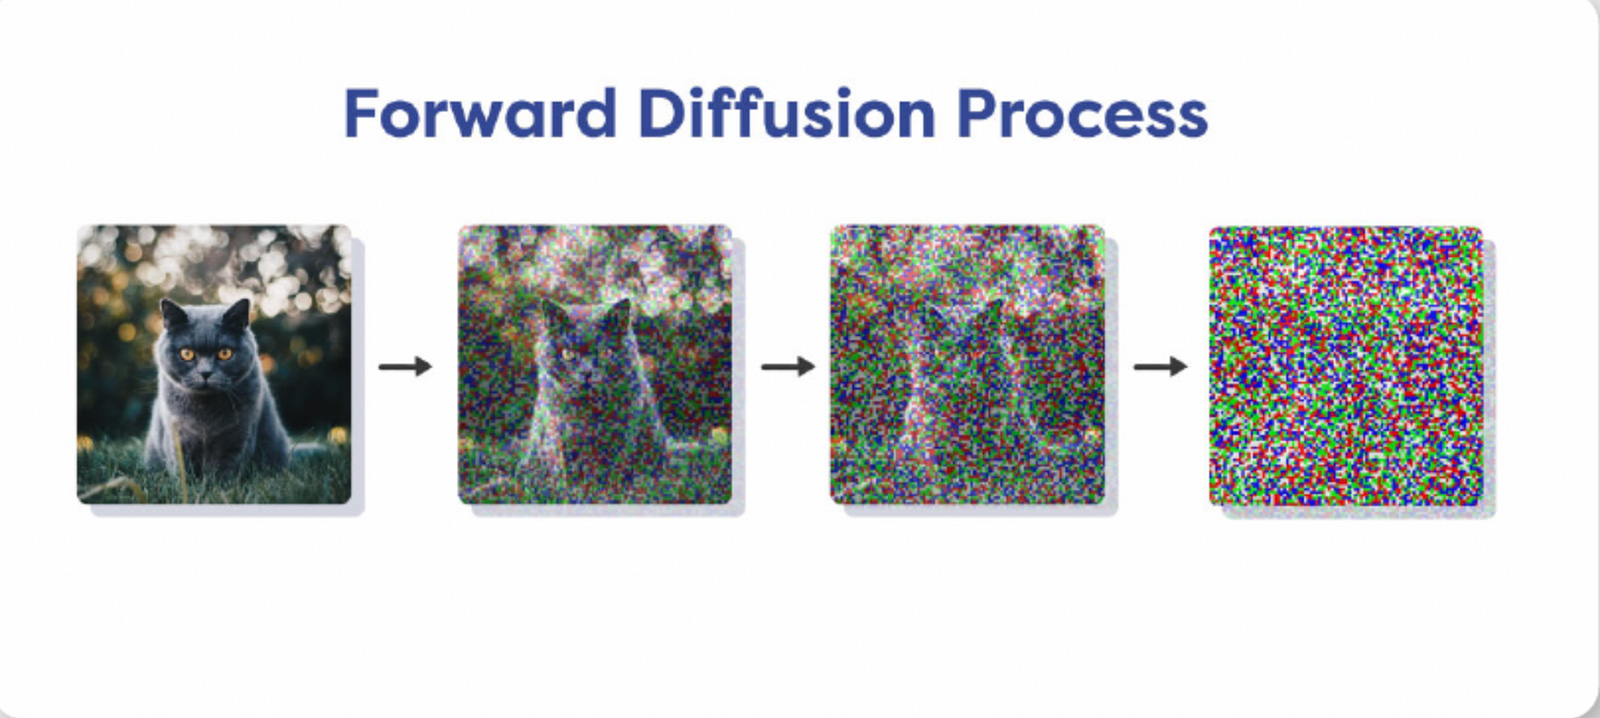
Now, to the examples. Let’s say you want to perform Image Denoising with the help of a Diffusion Model that takes in a noisy image and generates a clean image. During training we add noise to the image in small amounts in steps. At the end of several steps the noise completely destroys the original image and all structure is lost. That is Forward Diffusion Process.
Now, let’s move forward with Reverse Diffusion Process. When the amount of noise is small, we can use a Neural Network to remove the noise. As mentioned previously, these neural networks have an Encoder/Decoder based architecture, a popular example of this kind of neural network is called UNet(See below)
Denoising Process approaches:
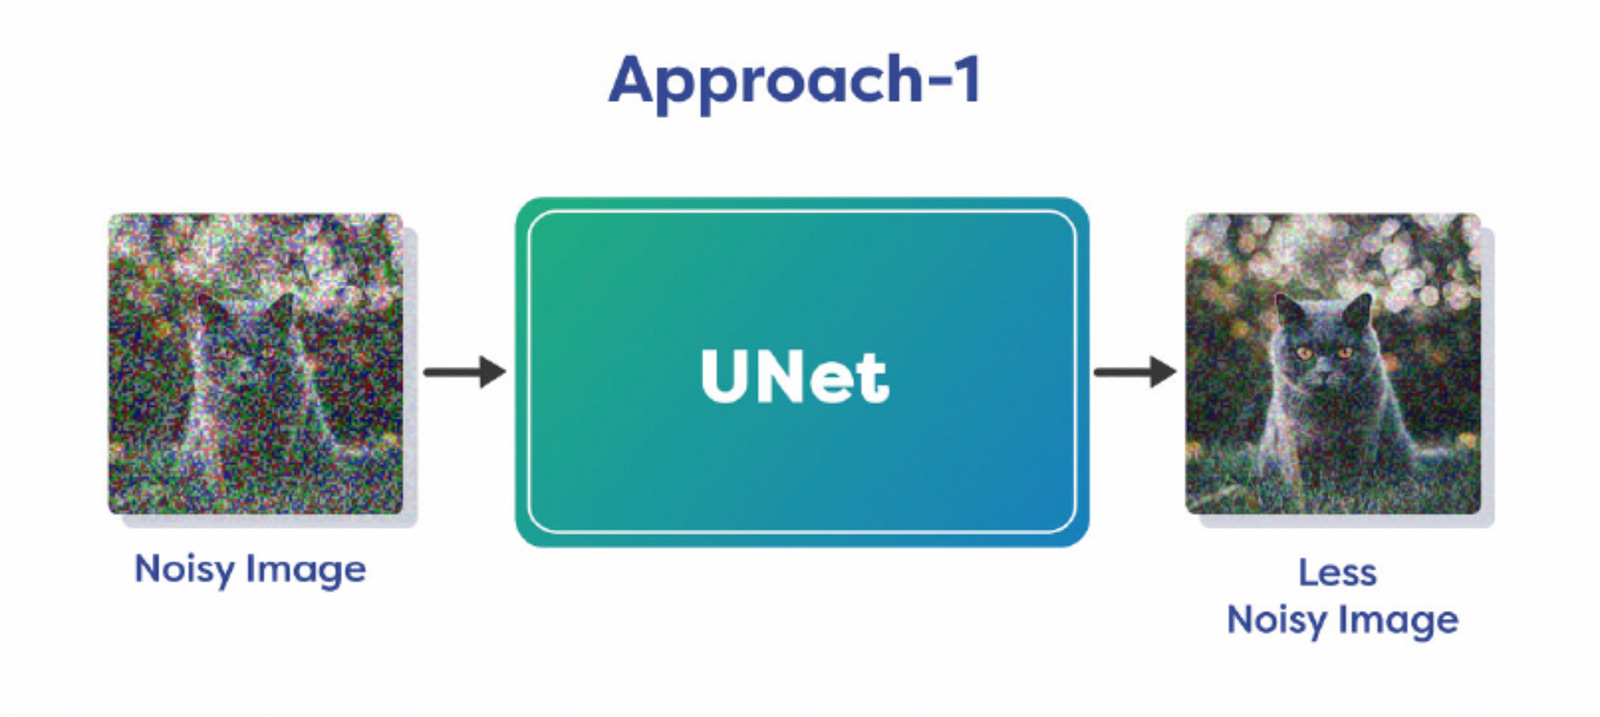
The model can learn from data and generate a less noisy version of the image directly.
Learn the distribution of noise and predict the noise itself, that you can subtract from the noisy image to generate the original denoised image.
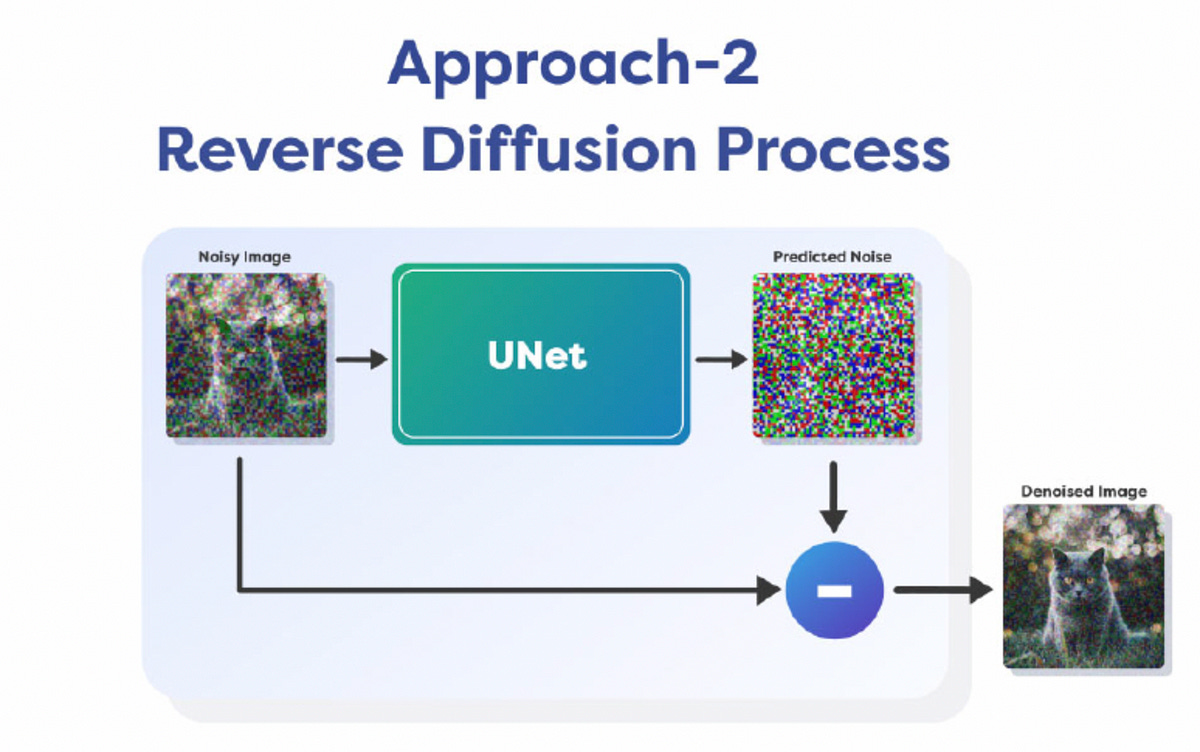
Removing all noise in a single chart is difficult, that is why it is done over multiple steps. We only remove a fraction of noise in each step and continue it for a fixed number of iterations. This allows us to keep the process stable and it prevents the failure of the optimization algorithm. So this is how diffusion models work in theory. They learn the Noise Distribution, Predict it and Remove it in a step-by-step process to generate a clean image.
Latent Diffusion Model (LDM)
So, you might be wondering, “What’s the big deal with Stable Diffusion?” Ever noticed how fast you could generate an image from single text prompt? But the diffusion process is very slow in fact as it can remove only a small amount of noise in each iteration. So, if you pass the whole image through the diffusion process, it takes a huge amount of time.
Stable Diffusion is a modified version of Latent Diffusion Model(LDM).
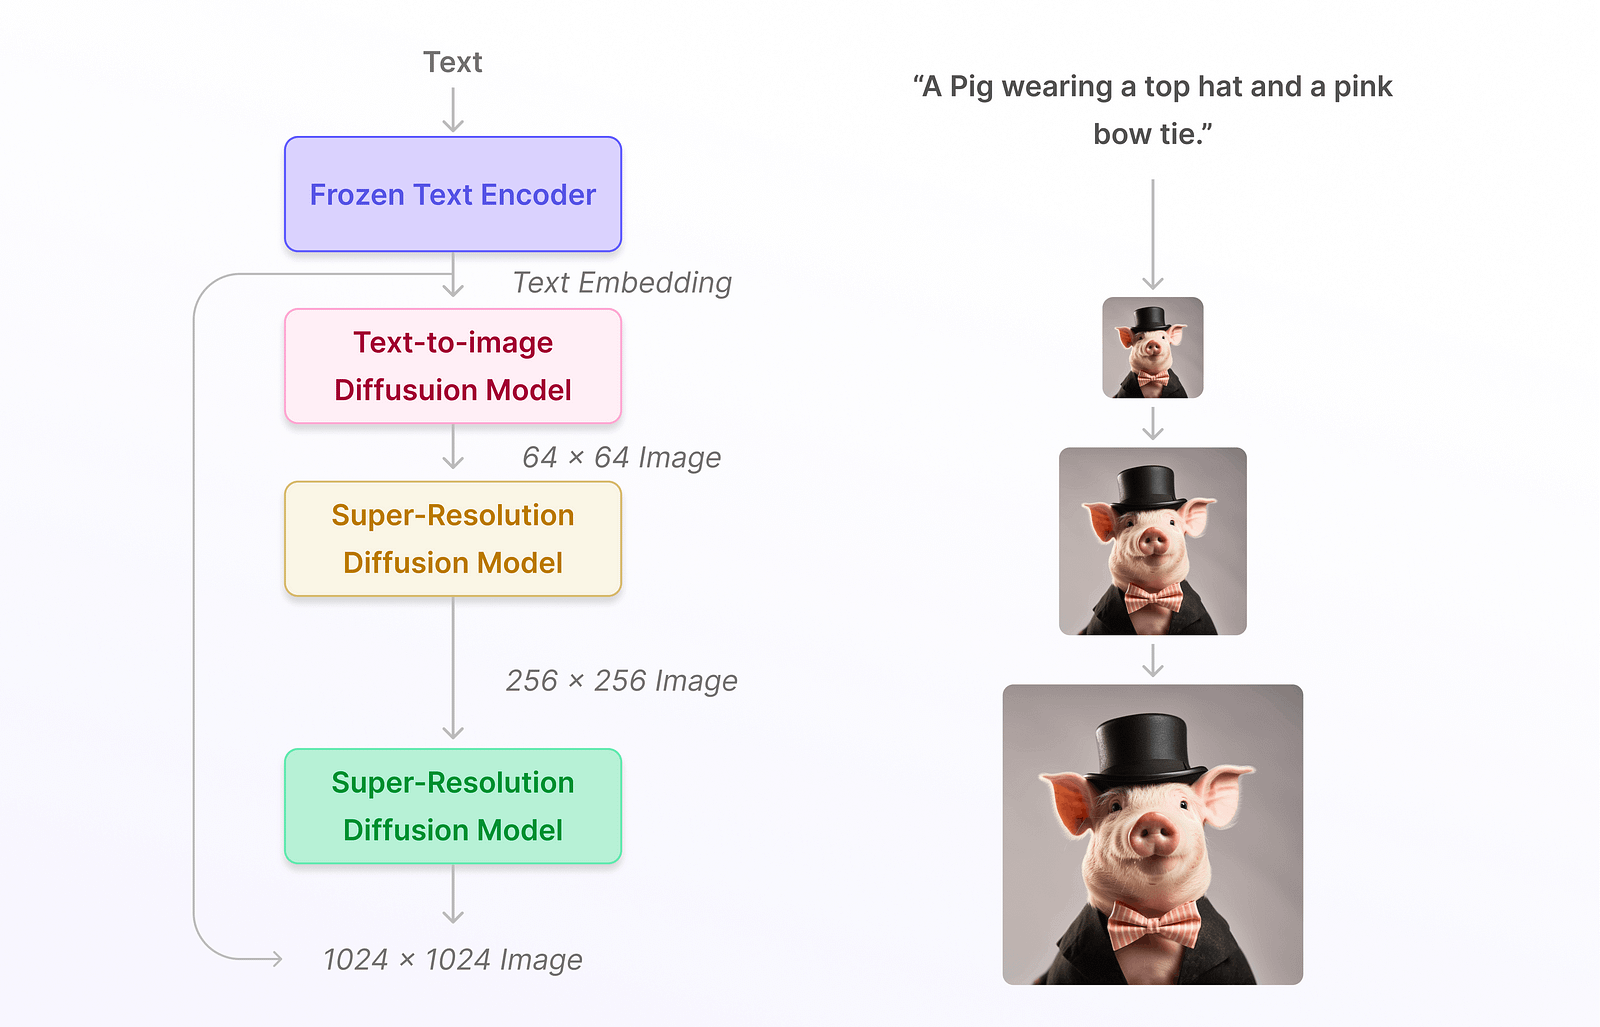
Unlike other generative models like Imagen, which directly work in the image space, Latent Diffusion models bring down the diffusion process from the Image Space to a Lower Dimensional Latent Space.
Hence the name Latent Diffusion Model. And how does it work?
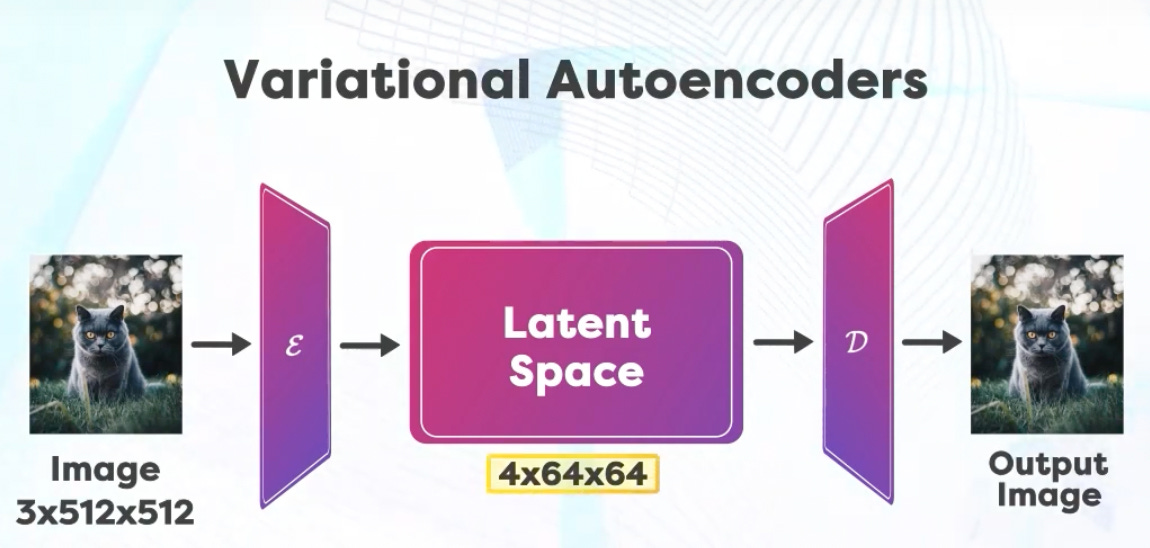
First a neural network called Variational Encoder is trained, which gives us a compressed version of the information available in the image space. For example the image could have a height of 512 and a width of 512 with three channels Red, Green and Blue. So this image can be represented by a matrix of size 3x512x512. After compression the latent space has a size of 4x64x64 which is much smaller number of elements.
Therefore the diffusion done in this latent space is much faster.
The “4” here indicates that the compressed latent space has 4 channels. This is different from the original image’s 3 channels (RGB). The exact nature or meaning of these 4 channels would depend on the design and purpose of the Variational Encoder. They could represent various features or aspects of the image that the encoder deems important for the task at hand. Examples:
Channel 1 represents the overall brightness or darkness of the face, channel 2 Captures the presence or absence of facial hair etc. Every feature could be different for different teams. During training it is usually provided Image-Text pairs to the model. These are then encoded into the latent space.
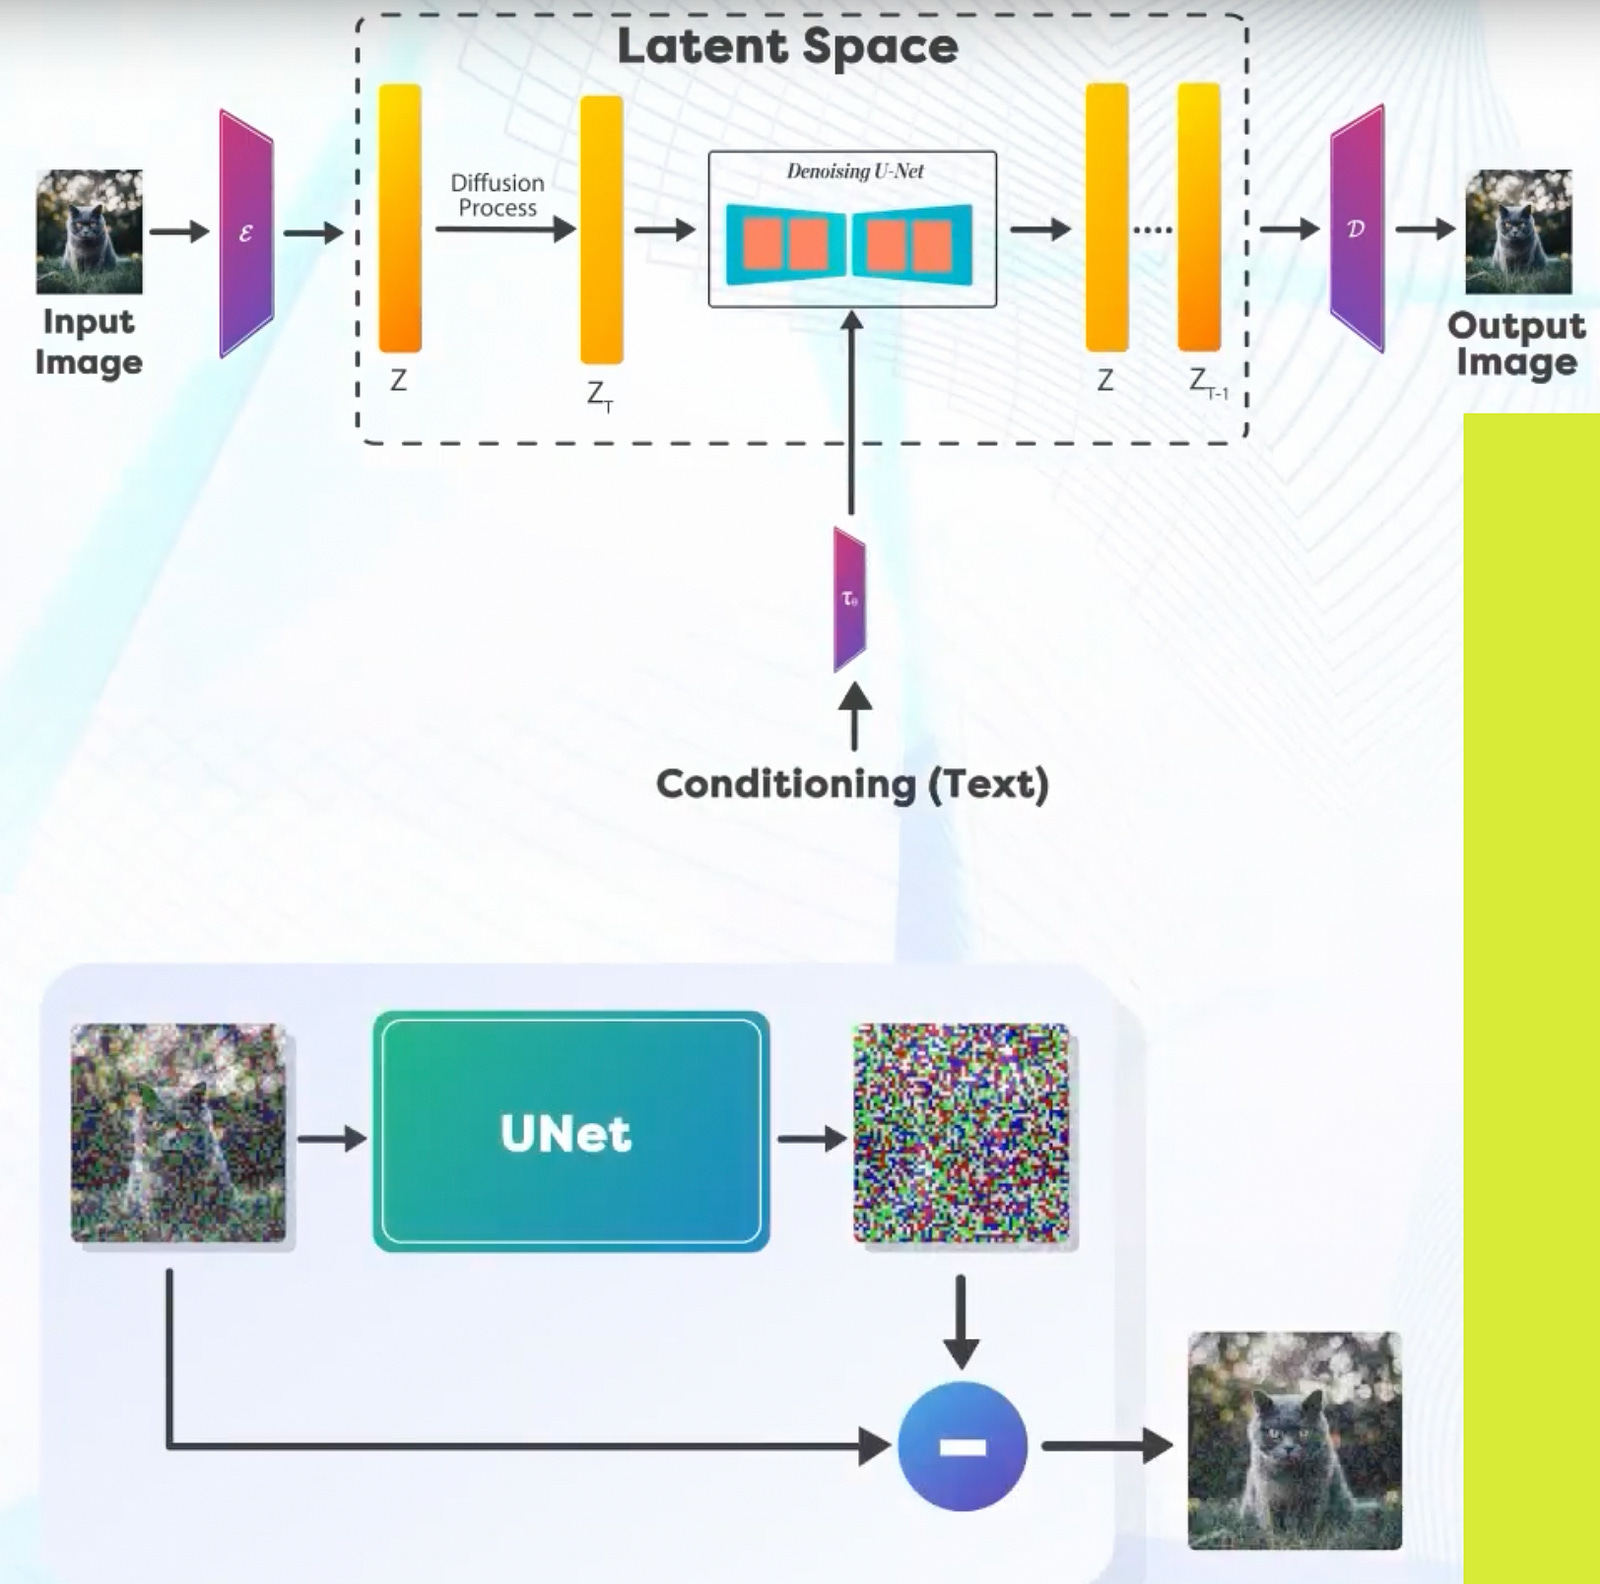
In the latent space the Forward Diffusion Process remains the same, that is why we start adding noise to the image in multiple steps.
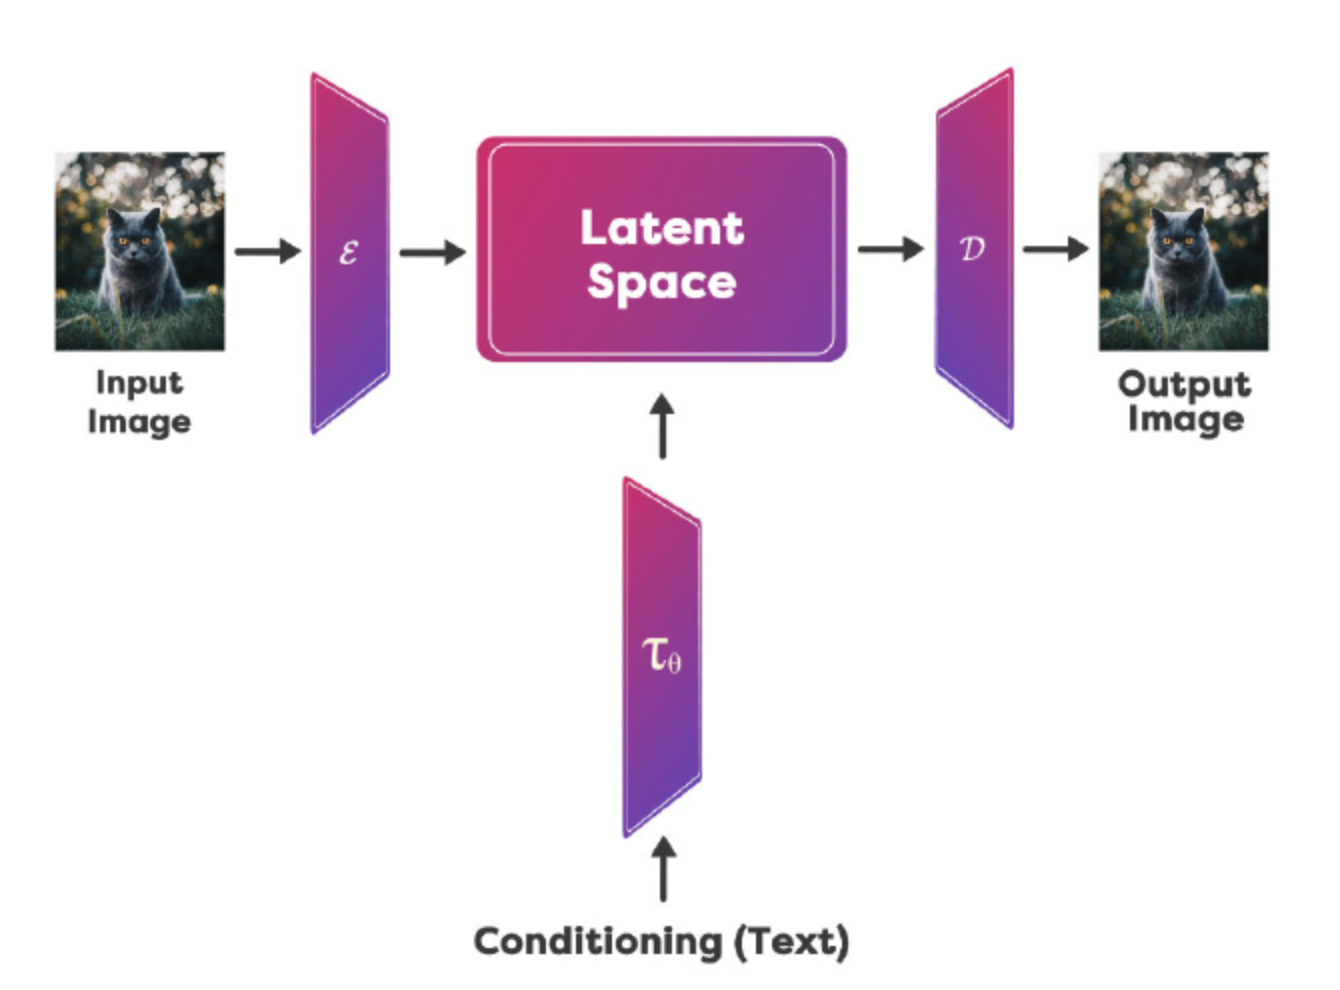
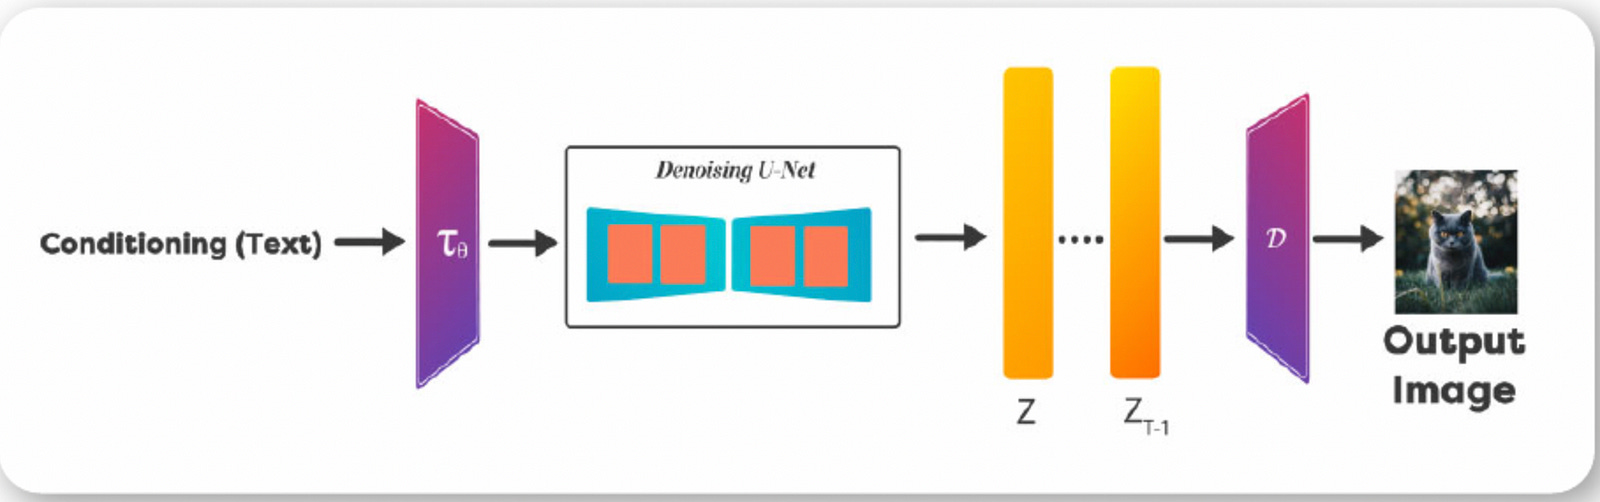
In the Reverse path, We perform denoising that is based on the image in the latent space as well as an encoding of the prompt provided.
Denoising Process (Reverse) is informed by the Prompt we use. The UNet performs the noise prediction and removes the noise to generate the next iteration of the image in the latent space. Once you get the Denoised image in the latent space, it is passed through the Decoder denoted by D to recover the Denoised image. Once you have trained a model, you can use it for performing inference. Before the UNet, the encoder part of the autoencoder-decoder model converts the input image into its latent representation.
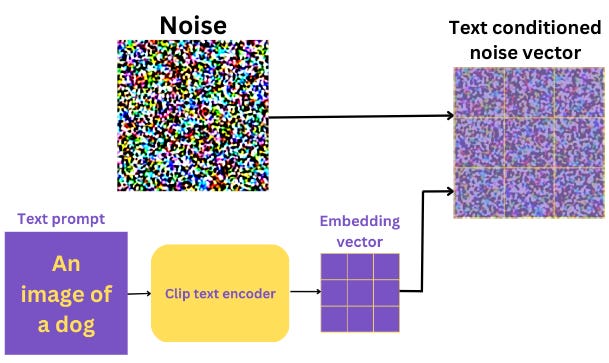
Text Conditioning, or simply “Prompt”
During inference we just use the Reverse Path to generate images from Text Prompts. Now, it’s important to remember that the UNet acts exclusively on the latent space and does not deal with the original image pixels at all. It is, of course conditioned by the text caption. The process of adding the caption information to the latent space is called text conditioning.
Not just text conditioning, the latent information also goes through a noise addition step, as mentioned above. From all the above information, the UNet tries to predict the noise added to the image.
During inference (denoising), we don’t have an image with us initially. Instead, we have to generate one using a text prompt. Also, we do not need the encoder part of the autoencoder-decoder network. This boils down the inference components to the following:
The pretrained text encoder.
The UNet noise predictor.
And the decoder part of the autoencoder-decoder network.
To summarize: we have a text prompt, and the noise needs to be conditioned on the text prompts. Apart from the input image and the encoder (which we don’t need anymore), every other component remains the same. We talked previously that in order to have a generative image, we need to realize it in steps. These are sampling steps that happen at UNet level.
So, the process looks like this:
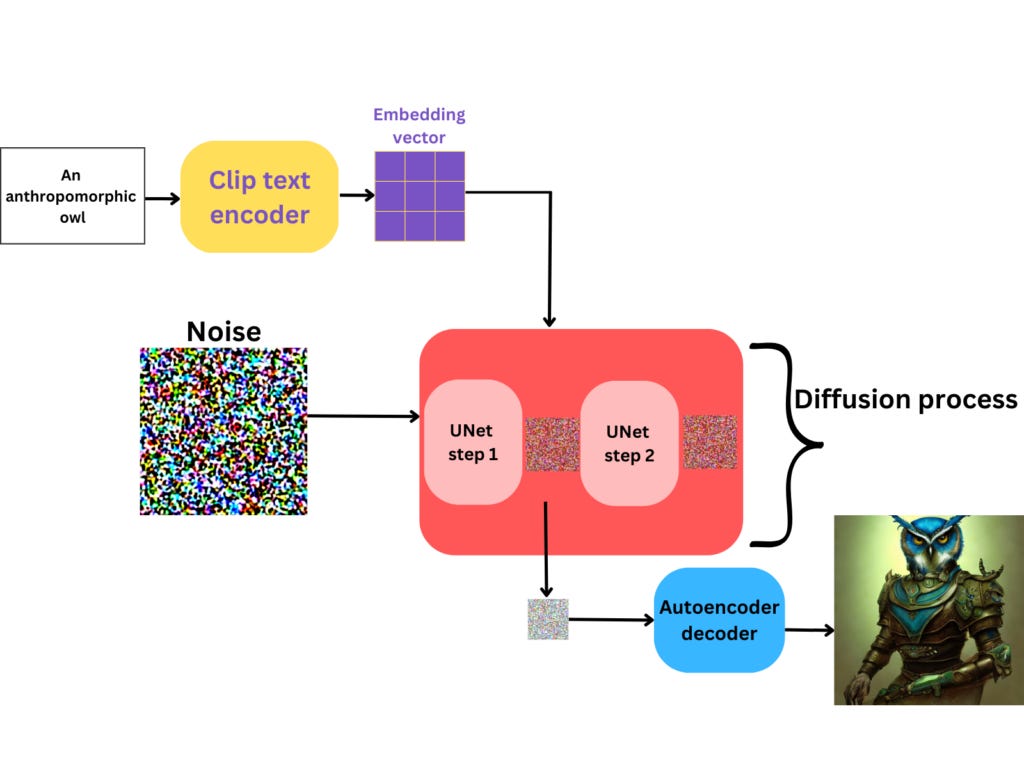
And this, ladies and gentlemen, is called reverse diffusion process.
That concludes how forward and reverse diffusion processes, encoder/decoder, UNet and text conditioning work.
We have covered the fundamentals of Stable Diffusion. Let’s try it out!
How to generate stunning images with Stable Diffusion? There are many platforms out there, but I would like to show you the one by Stability AI. and that’s dreamstudio.
Dream Studio by Stability AI
sign up at
https://dreamstudio.ai/
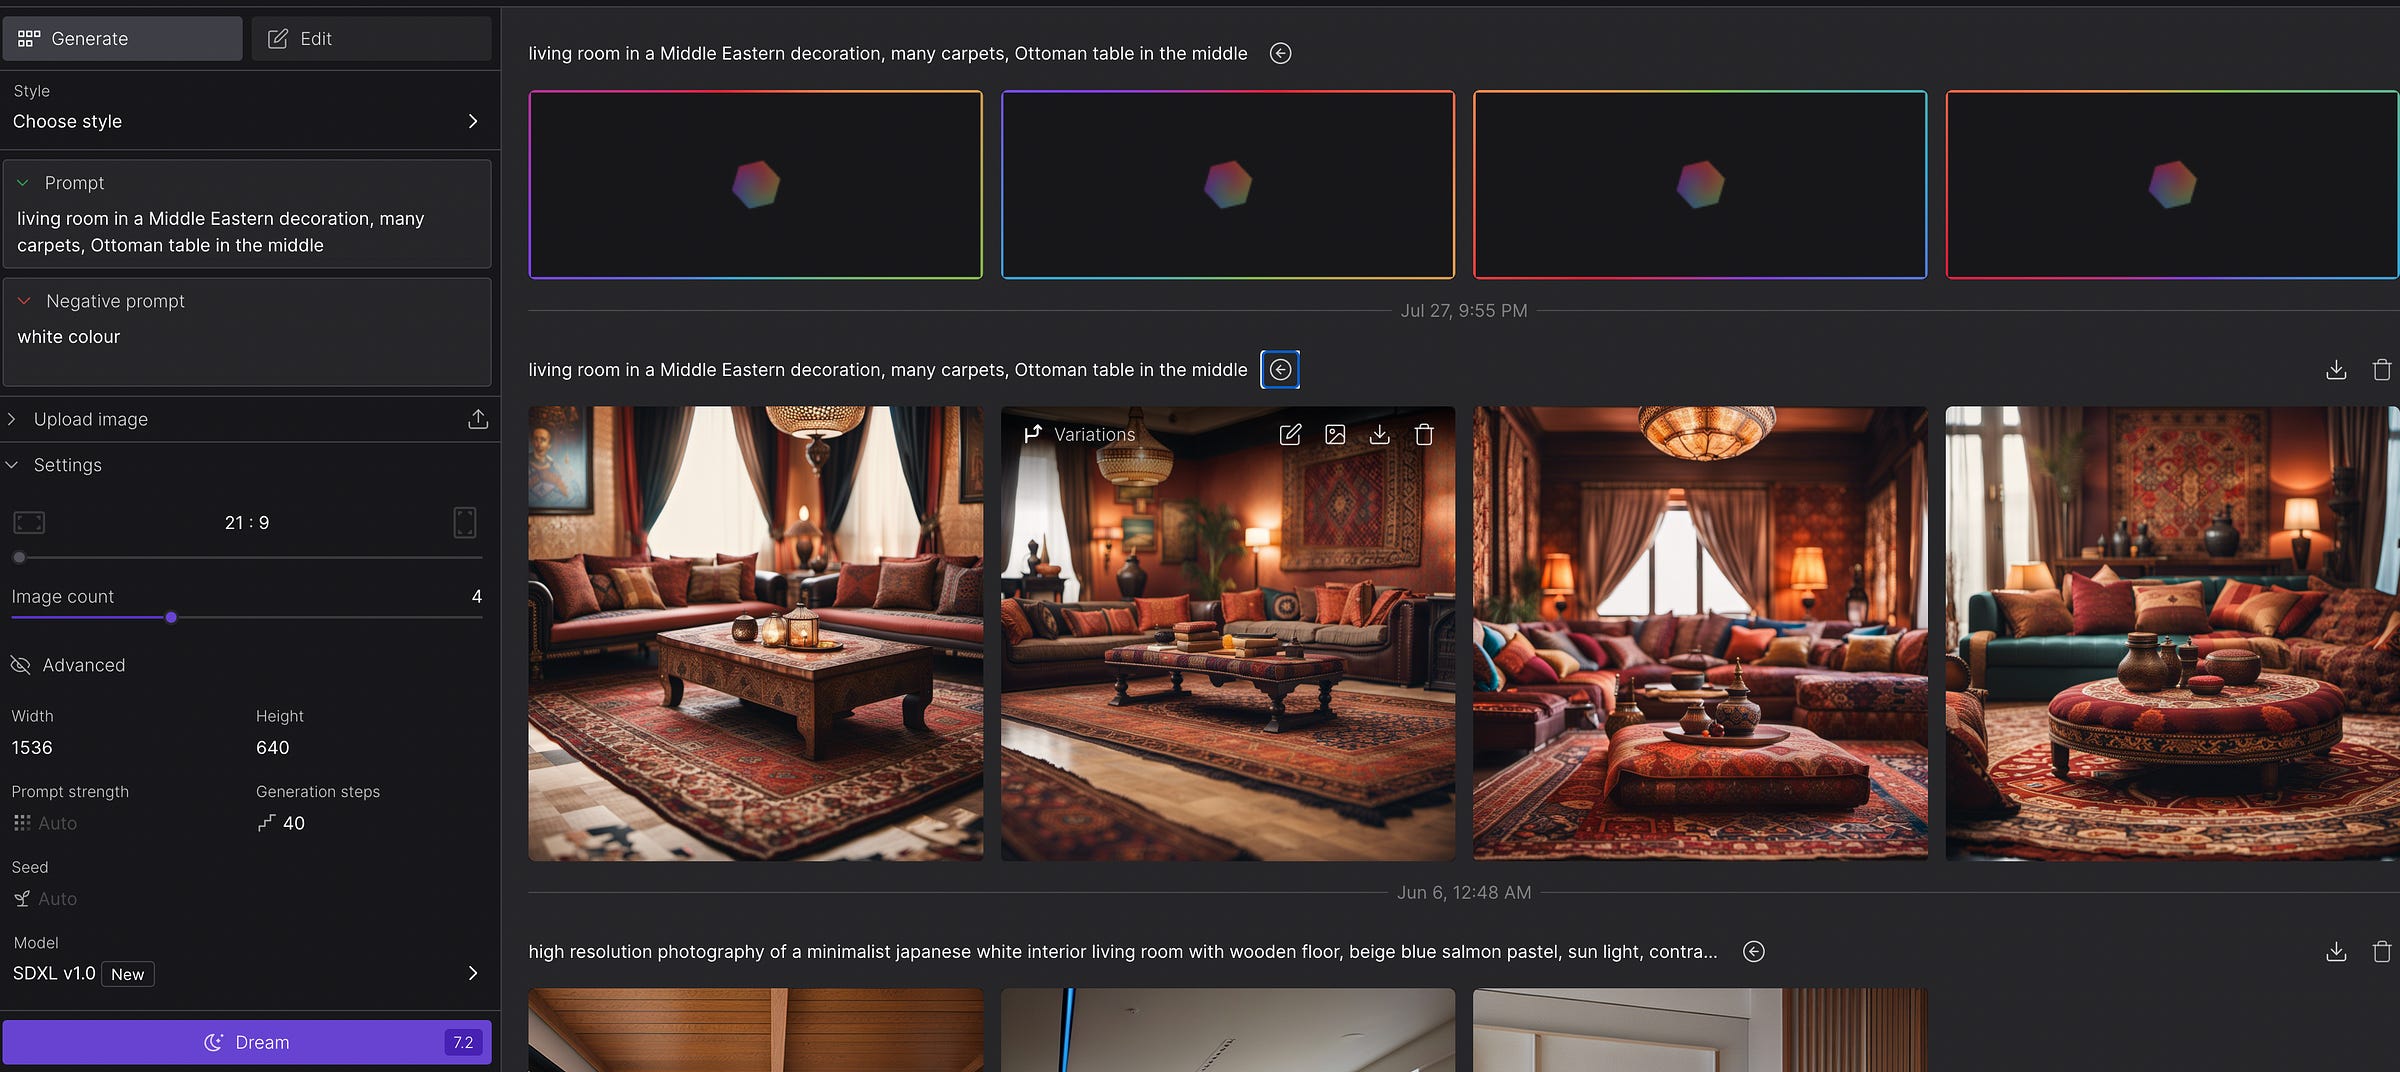
You end up in the platform which looks like this:
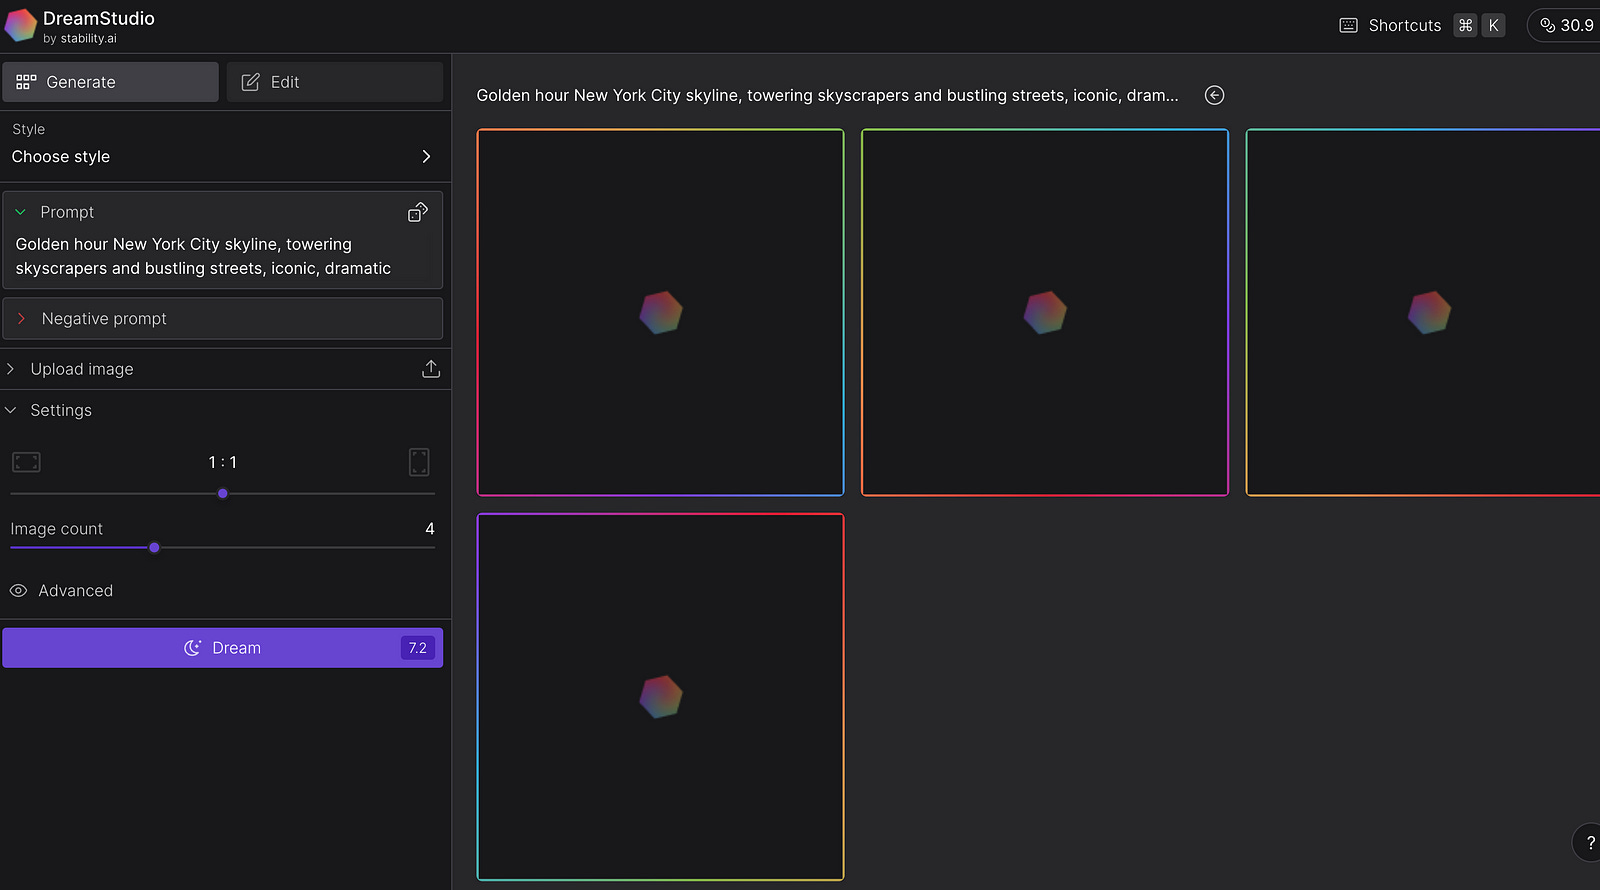
3. Before entering any prompt, you must know, it is not free. You get credits when you sign up. You spend credits for each prompt, so don’t use too much of it in the beginning. Make sure you calculate the credits. Before generating an image, You will see in the Dream button the number. It is 7.2 in my case. And at the top right, you see how many credits I have got left in total. It is 30.9 credits. Depending on your settings, each prompt will require more or less credits.
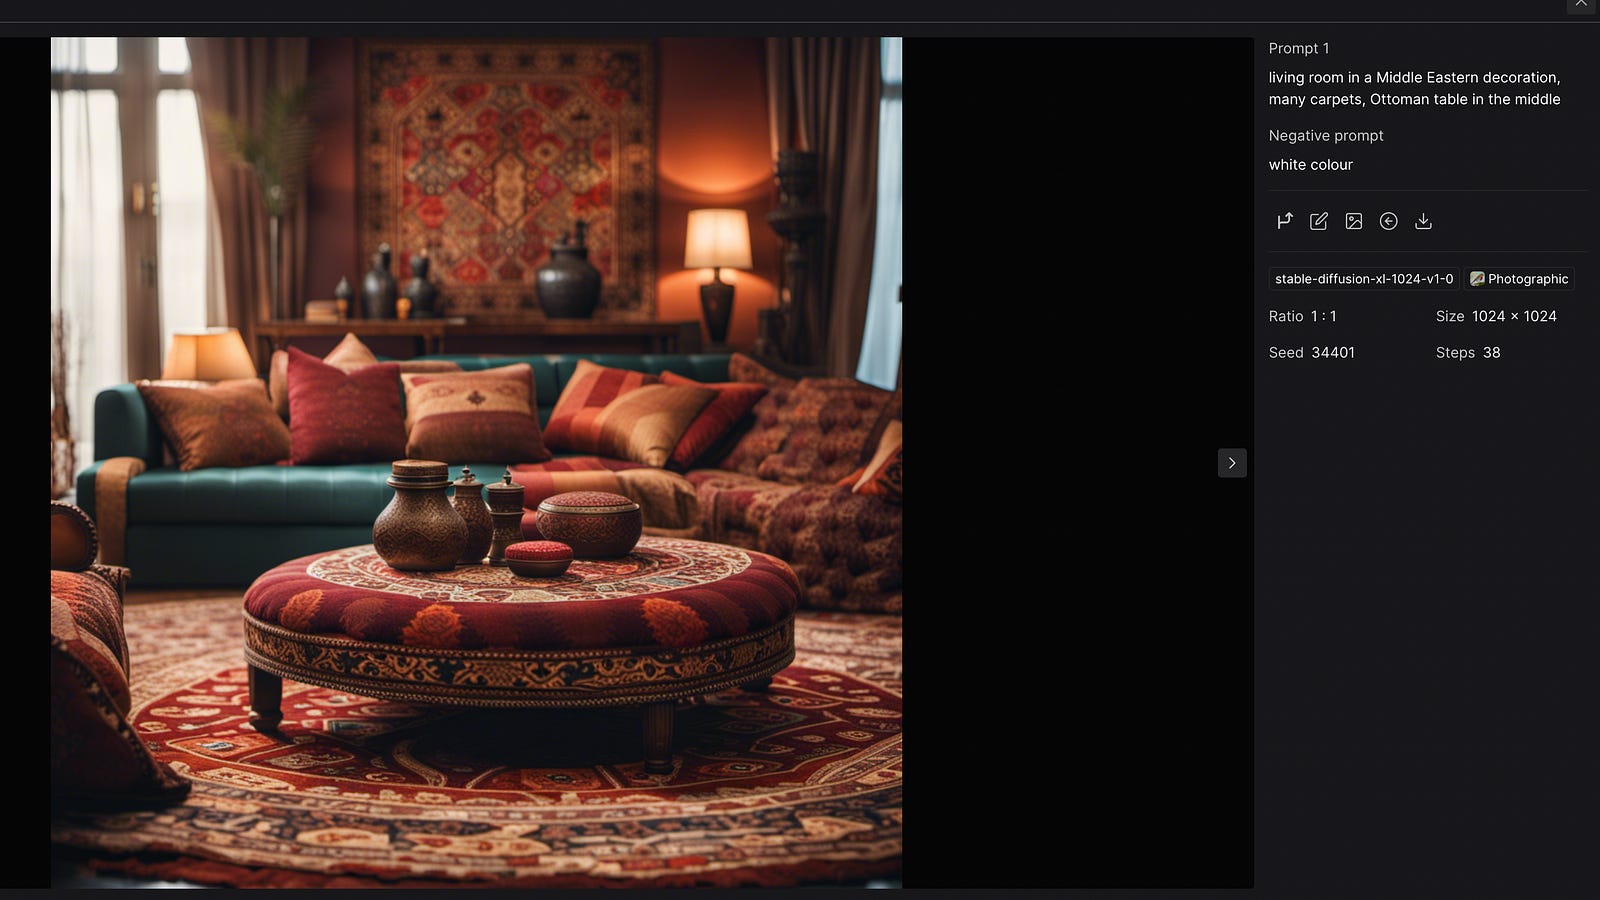
4. Now, to the magic part. I put the following prompt: “living room in a Middle Eastern decoration, many carpets, Ottoman table in the middle”
My settings were the following:
Photorealistic style, 38 steps, size: 1024x1024, 4 image variations, seed 34401
Once you click on advanced, you will see settings, that will affect your outcome. The more you experiment with these settings, the faster you learn to generate the best outcome.
General guidance for advanced settings:
Prompt strength: This controls how strongly SD weights your prompt when it’s generating images. It’s a number between 1 and 30 (the default appears to be around 15).
Seed: Seed in Stable Diffusion is a number used to initialize the generation. It is randomly generated when not specified. But controlling the seed can help you generate reproducible images, experiment with other parameters, or prompt variations. E.g. say have a seed number 123456, and when you generate another text prompt with this seed, it will give you the similar results. I included Seed of my previous generated image. Seed: 34401. Try out your prompt with this seed and share your prompt text and image in the comments section!
Steps: The more steps you use, the better quality you’ll achieve. But you shouldn’t set steps as high as possible. It’s all about the results you are trying to achieve. As you already know, diffusion models are iterative processes. The repetition stops when the desired number of steps is completed. Around 25 sampling steps are usually enough to achieve high-quality images. Using more may produce a slightly different picture, but not necessarily better quality.
Models: Stable Diffusion provides many models to try on. They all differ.

Let’s try it out one more time. To get the below image I used the following parameters:
model: stable-diffusion-xl-1024-v1–0 (new model by Stability.ai)
prompt strength: 17
Steps: 40
Style: Photorealistic
I also highly recommend these platforms — clipdrop and Stable Diffusion Web (this one is free).
Automatic 1111: Stable Diffusion Web UI
This is by far the best way to benefit from Stable Diffusion, but you will need some technical skills here. It was confusing for me as well, but once done, you can benefit a lot from it. My environment is on Mac, but it is quite similar to proceed with Windows and Linux environments.
Go to terminal or IDE (terminal). I use Pycharm for this purpose. Install Homebrew, a package manager for Mac, if you haven’t already. Type the following command on Terminal app or on Pycharm’s terminal, and press enter.
/bin/bash -c "$(curl -fsSL https://raw.githubusercontent.com/Homebrew/install/HEAD/install.sh)"2. Install a few required packages. Open a new terminal and run the following command
brew install cmake protobuf rust python@3.10 git wget3: Clone the AUTOMATIC1111 repository by running the following command in the terminal
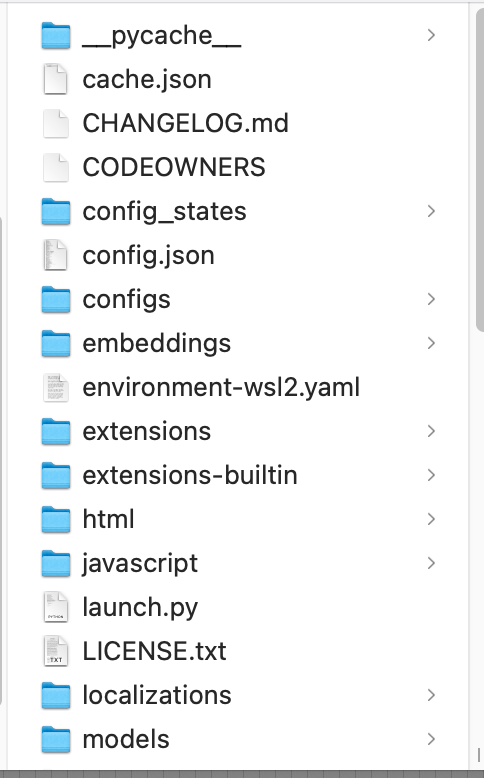
git clone https://github.com/AUTOMATIC1111/stable-diffusion-webuiA new folder stable-diffusion-webui should be created under your home directory.
You will see many folders and files under it like in the image below:
4. You will need a model to run Stable Diffusion. Use the following link to download the v1.5 model.
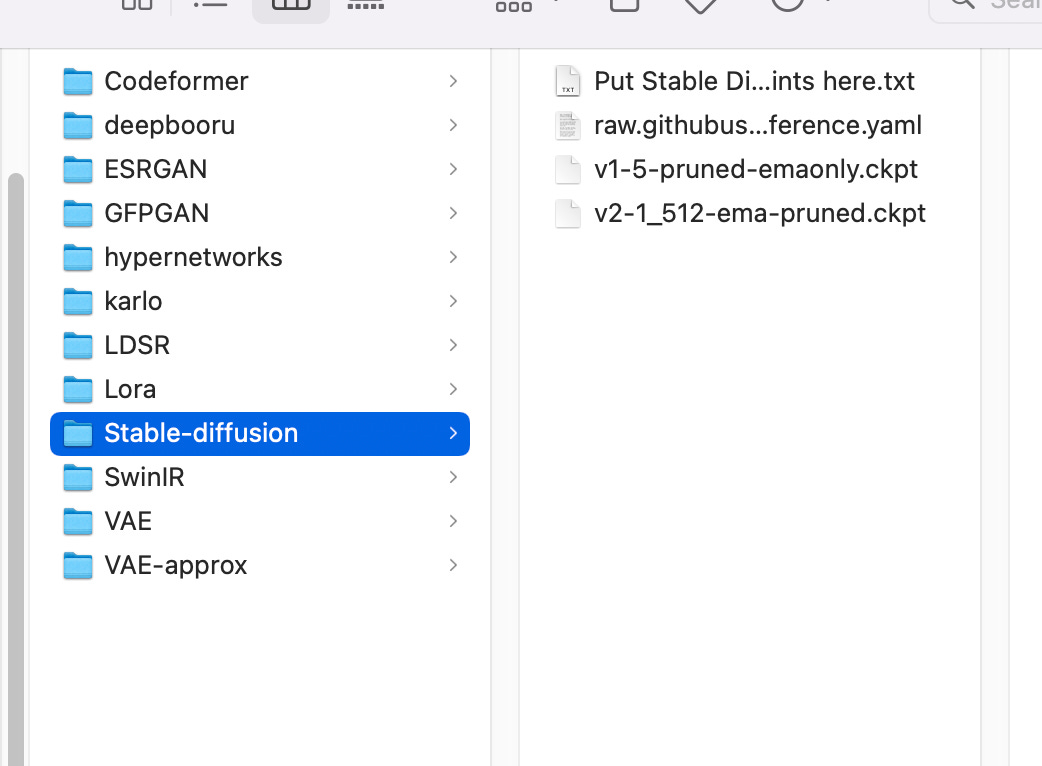
Put the file in the folder stable-diffusion-webui/models/Stable-diffusion. You can get there in the Finder app or via terminal. From Home menu in the finder app, go to the folder stable-diffusion-webui, and then models, and then Stable-diffusion.
When you finish this step, the Stable-diffusion folder should have files like the ones below. I also installed model version 2.1. Ping me from the comments section if you would like to install version 2.1
5. Run AUTOMATIC1111 on Mac
Follow the steps in this section to start AUTOMATIC1111 GUI for Stable Diffusion.
In the terminal, run the following command.
cd ~/stable-diffusion-webui;./webui.sh --no-halfIt will take some time to run it for the first time.
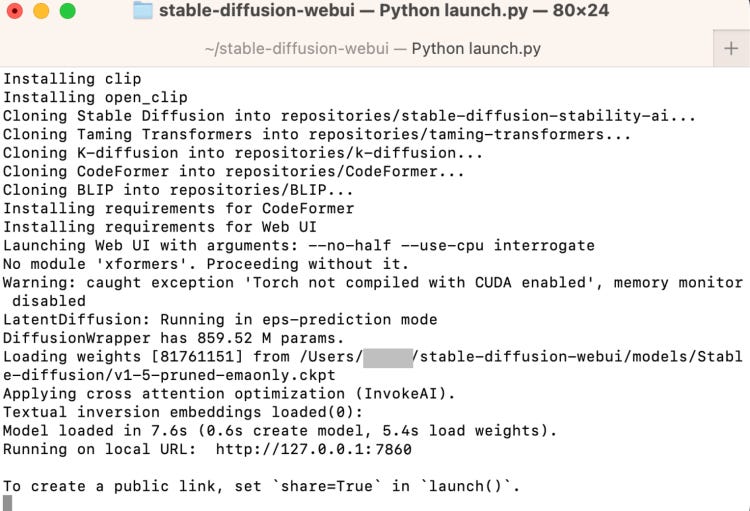
Open a web browser and click the following URL to start Stable Diffusion. In the terminal local host is hyperlinked that will open up a new tab in your browser.
http://127.0.0.1:7860/
6. Check out Automatic 1111 Web UI

These are the settings you may want to change if this is your first time using AUTOMATIC1111.
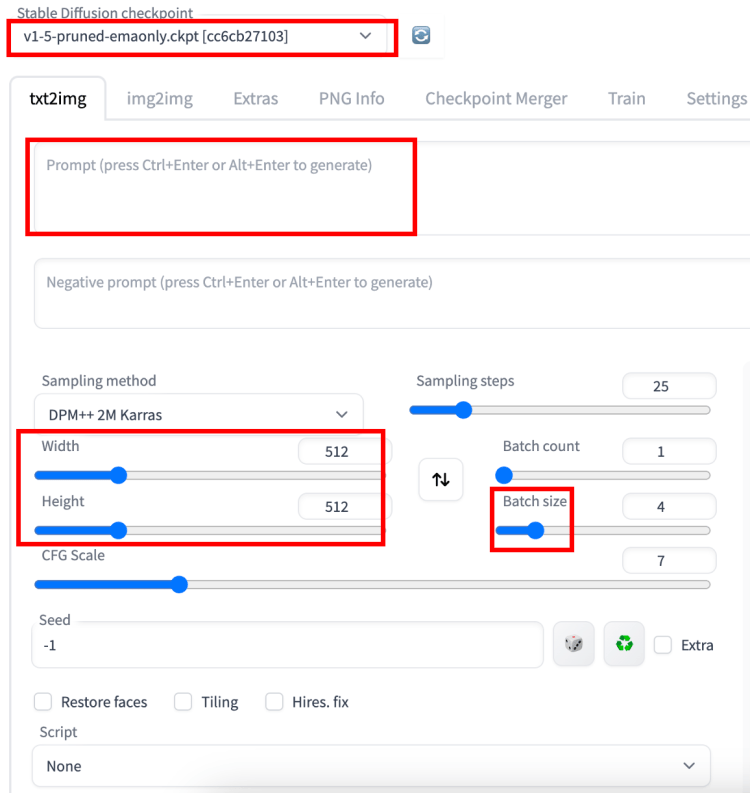
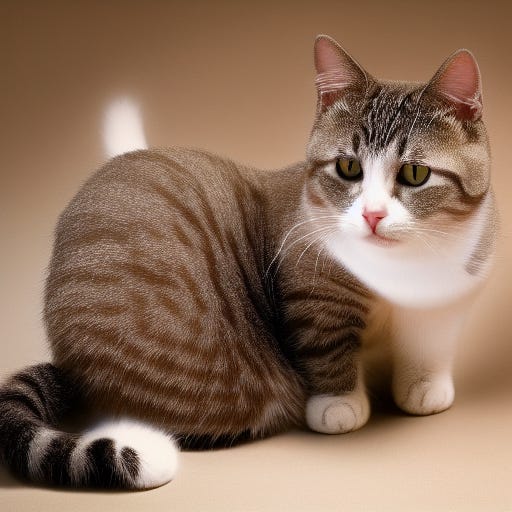
7. Put in a prompt “a cat” and press Generate to test using the GUI. That’s a lovely cat that was generated for me :)
Side note: While generating an image, you will be able to see the progress both in your terminal and web UI.

So this is how you generate images at Automatic 1111 web UI from your local machine. Let me know if something went wrong in your setup. It definitely went wrong for me for the first time.
Note: If you run in your local environment, it will take you a while to generate an image. So you need to have a powerful machine or connect to a server or run it in cloud. I suggest two options here:
Google Colab or Runpod. Both of these options are relatively affordable and easy to set up. Let me know if you have any other suggestions.
In the past, I covered the following articles: Midjourney, Runway.ml, Playground.ai and Lexica.